I know no one is reading our blog anymore since my last post was 1 year ago... I've really let myself go and apologize for not keeping up but a life with two kids is slightly busier than when we had one. But we are trying to come back and set things right by filling in the empty one year of our life while posting our current happenings so please bare with us...
First let us update you about our Summer... the Summer that got eaten by our Kitchen... At the end of Spring we seriously started to think about possibly updating our kitchen OURSELVES to simply try to save money... I(Anna) started to paint the walls from wood paneling color to primer white to a yellow called Pineapple Mousse, a very fitting color for a kitchen and it immediately brightened up our very dull wood colored kitchen...:-) Let's say this was at the beginning of May right after Madison's biggest ever Birthday Party which you will read later so yeah this kitchen adventure started even before our Summer started... Wow... It started nice and slow though I was just doing a lot of painting. We decided to keep our old cabinets since they seemed to be in very good condition once cleaned and after reading our Holmes Kitchen Makeover book found out cabinets take up about 40% of your Kitchen budget so we had to save as much of that as possible. Plus we were already having to buy whole new cabinets for our new island and a few more additional ones on the opposite wall, they were from Ikea but still added up to be a big chunk!

 |
| Here I am starting to paint the wood panels |
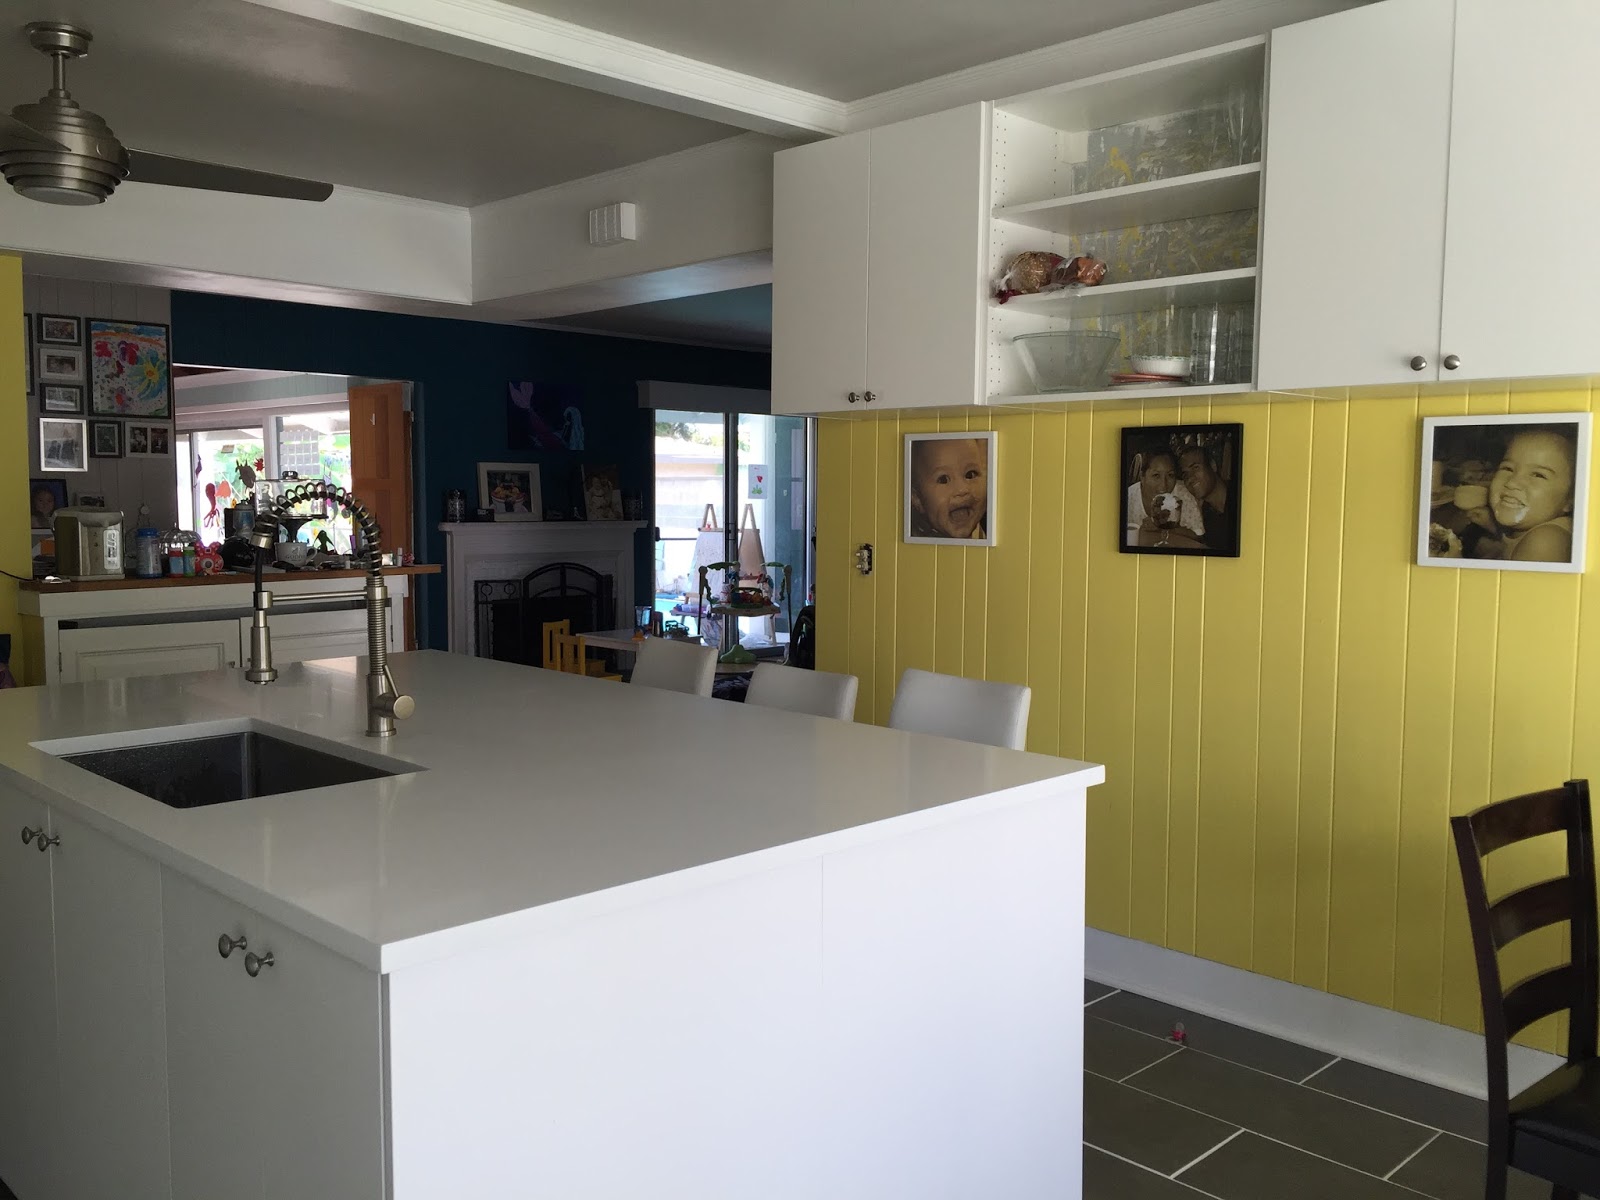
Here are the new hanging cabinets we installed first... You can see the middle one looks a little different... Well our handy man in training, Dave, put the backing backwards and we couldn't flip it without shredding the flimsy piece apart I decided to make lemonade out of a lemon and painted it to fit in with the color theme of the kitchen and we decided to leave the doors off so we can display some pretty dishes we may buy in the future... The paint color looks very orangy here but the actual color is much yellower and better:-)


Next step we took was replacing our lights, we had one hanging light and one ceiling light before but we got brand new stainless steel ceiling lights to replace... Maybe way down the road we can add some recessed lightings too... The not so fun part of this process was it took so much longer to install than the two other ceiling lights we've installed in other rooms... At one point Dave had to travel over in our attic to try to set up braces and it was pain but I think we realized later he could have tightened them from below but these findings are part of "DIY" process and believe me we have way too many of those!


You may be wondering what is Anna doing all this time, let me tell you what I was doing... I was either painting or cleaning grease off those old cabinet doors and prepping for painting. It was soooo much painting, good thing I enjoy painting because by the end I was so over painting and so happy to be finally done-ish with it! Oh well I have one last stinking drawer to paint but somehow I made it without pulling all my hair out:-)
Okay where were we... so just like so many other DIYers we turn to Ikea
for our cabinet needs and just save us from totally stressing out and
frustrated we decided to go ahead and get counter tops from there as
well... I only had my eyes on Quartz for the luxurious clean modern look
that it gives plus it is so low maintenance I could not think about any
other stone like Granite and Marble... In order to afford a huge piece
of Quartz we went ahead and chose a piece of butcher block for the rest
of the counter top area and I love the contrast in color that those two
brought into our new kitchen:-) We got home with boxes and boxes of our
island cabinets and it was finally time to say good bye to our tiny
island with an ugly sink and the dishmaster! Our super handy friend from
church Rhett helped us demolish our island and prep the floor for our
much bigger island cabinets one Sunday. Boy we could not have done it
without him, we way under estimated the work it takes to remove the tiny
island and it seriously took solid 8hours or so of Dave and Rhett
working super hard... We found out somehow two previous owners put down
like 5 different layers of cheap linoleum flooring for us to peel off
and right under the sink something we never want to find out, some kind
of warm and cozy living area for rats or mice of some sort... GROSS! but
after a few sweeps it was all gone:-) Now it's looking more like a
surface we want to secure our new island cabinets on! Rhett stayed
really late the same Sunday and it was time for him to go... We were
very sad to see him go because now it was up to us to put the cabinets
together and secure AND make sure the top was all level and flat!


 |
| The gentlemen let me take a part of the demo! |
 |
| It was too easy...:-) |
 |
| A lot of evidences of something making a home here... |
I guess I didn't take any pictures of Dave building the cabinets but here we are! Having plastic legs instead of metal legs to hold up these cabinets make us really nervous but I guess we are not the only customer so should be okay!? We did our best at leveling the whole thing and seriously took all day to adjust and level, then adjust and level some more... We were only allowed 1/8" off for the counter top before we can get it templated for our counter top so we were really nervous and our not long enough level made us believe we were. Another hiccup to this counter top phase we encountered was that the stainless steel farm house sink I originally ordered was about 1" too big for our sink cabinet and had to order smaller one and since the sink needs to be there at the templating we had to push back the big day about a week, Ugh! One big positive thing out of this was that we now have an under mount sink we love so much more than the farmhouse sink, honestly we are not farmhouse people and I would have hated it in the end big time! Another week of no sink/dishwasher but it was totally worth it:-)

The templating day came and we held our breaths like we never have AND there was a spot that had 1/4" off(Yikes!) but the super nice guy Art assured us the installer can probably fix it and we were able to get it templated! A huge sigh here:-) Now we have to wait two weeks! Can't wait!
 |
| I got busy with painting cabinet doors... |
 |
| Cut a big hole in our wall! Ready for the hood installation! |
While we wait for the counter top we have so much to get done! We still need to install the exhaust hood that actually exhaust to outside and then install the butcher block counter top to the back wall side where the stove is and to finish that area backslash needs to go on... In order to install the butcher block our handy friend Rhett to the rescue...:-) We bought one 90 some inches piece and one 70 some inches piece from Ikea and between the wall side counter and the bar top we created by cutting off half of existing bar to better open up the layout we were able to use up the entire two pieces perfectly! And the cut out I got from the stove I was able to make a very big chopping block:-)


 |
| We chopped off the bar that curved around to create more open layout:-) |


After the butcher block got installed I started Gasp! my first ever attempt at doing backsplash... I was very nervous and watched a video many times prior to starting then one day I took the plunge! BUT of course this project came with a huge problem!

I started to install the back splash and as I went I started to notice the wood backing wasn't as solid as I thought then when I got to the side part where it's definitely solid wood I was more and more sure that the first part of back wall is not what it should be... Then I started to see...:-( I started to see that the plywood type cheap wall was starting to sag and buckle out with the weight of tiles... I put a nice wood panel against the area with weight behind hoping well once the thinset sets it will hold... The answer will be no... A few hours later I checked to see my hopes and dreams were gone so I quickly tried to look up "what to do if the wall can't hold the backsplash up?" or something like that and apparently no one ever have this problem! I should have known that wall would be a problem and now I know but back then I didn't question it... SO I took a deep breath and returned to the kitchen and started to remove the backsplash...The top part of the wall we put up a brand new solid wood panel and was holding no problem so I left the tiles there and another shocker to this new challenge was that each tile came off separately off the mesh backing so now I have tons and tons of little domino sized tiles... I would fill up a bowl and run them to the bathtub filled with hot water to soak in order to get the thinset off of them. I wasn't gonna waste them and wasn't going to spend another $300 buying new set of tiles with backings... So after removing all the sagging tiles I went to scrub each tiles clean... I was glad I didn't wait any longer because some of them were pretty hard to clean so I left all the tiles in there over night and I spent the following day scrubbing each tile clean... Dave spent all day taking care of kids and removing the crappy wall and replacing with the same solid wood panel and I think he felt bad enough that he was willing to buy entire backsplash for me... So sweet, so we agreed on maybe buying 5 more sheets and I came up with a cool idea to use those tiles for the thresh hold... All the scrubbing did a lot to my fingers so when I go to use my iphone I could no longer unlock it with my finger print which made me sad... Oh well... When you see the finished wall you will know it was all worth it though:-)
 |
| BAD plywood!! |
 |
| Under the bad plywood we discover faux brick wall... Weird but solid! |
I was dreaming of mostly white kitchen but I was hoping the backsplash will add a nice touch of glam then I came across this backsplash at Lowe's and weirdly they had it vertical and looked funny but because of that it was on sale!! Under $10 per sheet! Of course I used them horizontal and they are perfect for our kitchen:-) Close up they have the pearly look to it and a great wow factor!
Grouting was another first experience and messy and required a lot of cleaning afterwards but it came out great! I learned a lot from this backsplash project and feel more confident to tackle the bathrooms in the future!
Two weeks later has passed and it's finally here!!!!!
Quartz is a really heavy material so even from the truck to our kitchen it was a big deal and took them a while to decide what to do I guess? It was entirely in Spanish so not sure maybe they were just planning where to eat lunch at but it required a lot of talking among themselves beforehand... I remember cheering loudly when it finally made it up on the island cabinets! They were able to fix the 1/4" off spot and level it out for us, wow what a relief! We still have a lot to get done but it was such a nice feeling to have that part done:-)
I failed to take pictures but after a few trials and error we were able to install the new hood and it actually works! Yay! But right after the butcher block went on our oven stopped working and Dave researched and tried to fix it but in the end we thought the old oven finally want to go to sleep for good so we started to research for new oven... and I know what you are thinking... I did not break it! I was perfectly content with the old oven it was doing it's job and the oldness didn't really bother me:-) Anyways, a trip to Lowe's taught us that the opening for the wall oven is rather small so we basically only have 2 to choose from... then one thing led to another and we decided to go with the double oven like good home chefs deserve:-) We figured we can remove the drawers underneath to create a space for the double oven set up... "Make it work!" I could hear Tim Gunn say that to us:-) AND he would want the new oven to match the fridge so we decided to upgrade to the fancier fridge that will give us water and ice whenever we want... and we absolutely have no regrets here, after about 3 weeks of using it our girls get unlimited supply of crushed ice whenever they want to munch on and it has been truly wonderful...:-)
After the island got installed and sink ready to be connected back again we sort of stumbled... We do care about the environment we decided to remove the garbage disposal for good but maybe that made the job a little more complicated and Dave literary made so many trips to Lowe's trying to buy right parts but we were starting to see small leak somewhere in the end we had to call our trusty plumber Ozzie... He has installed our water heater a few months ago and he was so great so we called him again. I wish my Dad were here to take care of it though:-) Ozzie even got us ready with the waterline for the new fridge which saved Dave a trip through the crawl space!
We had planned a short getaway to truly get away from all the kitchen work we've been doing and only have fun while staying at a well air conditioned hotel right about here but that will have to be another post since I'm trying to finish this kitchen post as soon as possible for the families to read:-)
While we were away our friend Robert and Rhett pulled up all the old laminate layers and prepped the floor for us. We had picked out medium grey porcelain floor tiles for our kitchen and I had a plan to use some of the leftover back splash tiles as a cool thresh hold between the porcelain and hardwood flooring.
 |
| I showed the guys my idea and they were up for this new experience:-) |
I just feel like Dave always gets stuck with projects that require professional help, well he is not the handiest guy in the world he is more of a "Handy man in training" but yeah our oven installation couldn't go without a professional's help... well that's not true, all the installation part was good and turned on and everything except when we try to heat the oven there was no heat so we thought we wired wrong but that was not the case and we had to turn to yelp for a good electrician who was able to come out that day and diagnose the problem... Apparently there was some kind of bottle neck happening that prevented another additional 120v from getting to the oven... and fortunately whatever the part he needed to access was right next the oven where it's easily accessible, Hooray! He clipped a few wires and Dave got the best burn ever when the oven heated up as it should:-) One hiccup was that the electrician told us that since we went from a single oven to a double oven the wattage should go up to 40 so I can use both oven at the same time without tripping... Make sense, so he returned later that week to do the job and now we officially have a working double oven and can't wait to prepare the Thanksgiving feast this year!


Next day(Saturday) Robert and Rhett came back and installed the floor and once again
we were very thankful for them and their professional tools for the
perfect finish:-) The following day I got busy grouting the floor while
Dave kept kids busy in the pool:-) We are almost done people! Robert came back one more time to put in quarter rounds everywhere and even refinished the part of hardwood floor that was covered with the kitchen linoleum so the entry way look how it should...
And without further
Okay first memorize this picture... then scroll down please:-)
 |
| Before Picture... |
8 weeks plus of our blood, sweat & money...!!! By the way I was waiting until we are 100% done but that last 5% or so of work is taking way too long so I just decided to take pictures at 95% finished... Sorry!